Difference between revisions of "STS35 Temperature Sensor SKU: CQRSTS35A"
(→Raspberry Pi Example and Test Code) |
(→Raspberry Pi Example and Test Code) |
||
| Line 233: | Line 233: | ||
[[File:CQRSTS35A-11.jpg|800px]] | [[File:CQRSTS35A-11.jpg|800px]] | ||
| + | |||
| + | '''1.4 The STS35 temperature sensor detects the temperature of the environment as shown in the figure:''' | ||
| + | |||
| + | [[File:CQRSTS35A-12.jpg|800px]] | ||
---- | ---- | ||
Latest revision as of 06:50, 6 December 2022
Contents
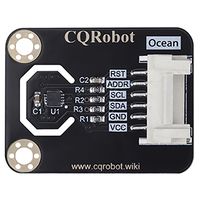
Description
The STS35 temperature sensor from Sensirion gives a fully calibrated, linearized, and supply-voltage-compensated digital output and has an outstanding accuracy of up to +/–0.1Degree Celsius.
It provides an operating temperature range of -40 degree selsius to +125 degree celsius and up to 1MHz I2C communication rate. Besides, the sensor can heat up itself to dehumidify the chip, which means it can function properly in a certain level of humidity.
STS35 Chip Specification Download
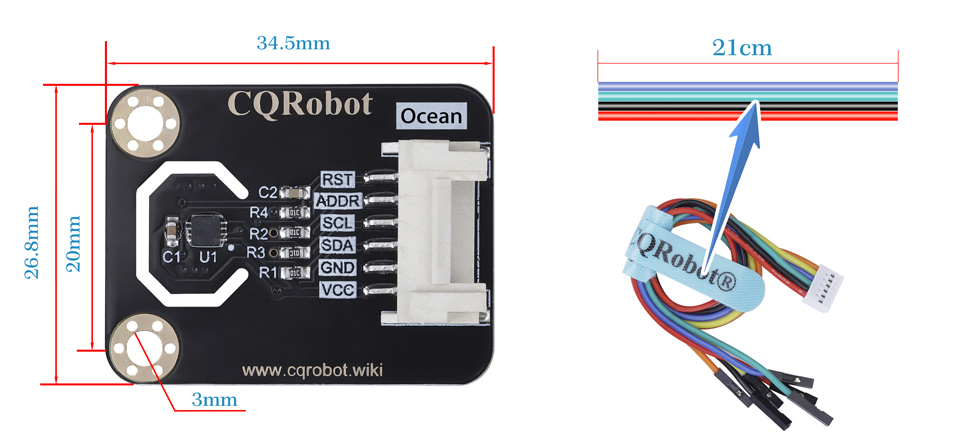
Size Display
Specifications
STS35 Temperature Sensor Board Specifications
- Operating Voltage: 2.15V to 5.5V DC;
- Heating Power Consumption: 3.6mW to 33mW;
- Output Signal: I2C;
- Measuring Range: -40 Degree Celsius to +125 Degree Celsius;
- Accuracy: Plus/Minus 0.1 Degree Celsius;
- Resolution: 0.01 Degree Celsius;
- Preheat: Less Than or Equal to 1.5ms (Typical, 0.5ms);
- Response Time: More Than 2s;
- Operating Temperature: -40 Degree Celsius to +125 Degree Celsius;
- Size: 34.5* 26.8 * 2 (mm) / 1.35 * 1.05 * 0.08 (inch);
- Mounting Hole Size: M3 (3mm); Pitch 20mm.
Ocean Interface Cable Specifications
- Cable specifications: 22AWGMaterial: Silicone
- Withstand Voltage: Less Than 50V
- Withstand Current: Less Than 1000MA
- Length: 21cm
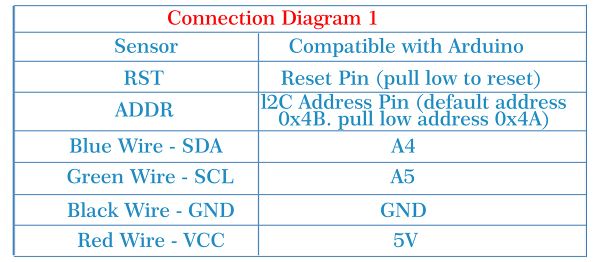
- Line Sequence: Black-Negative Power Supply; Red-Positive Power Supply; Green-SDA; Blue-SCL; Yellow-ADDR; Orange-RST.
Arduino Example and Test Code
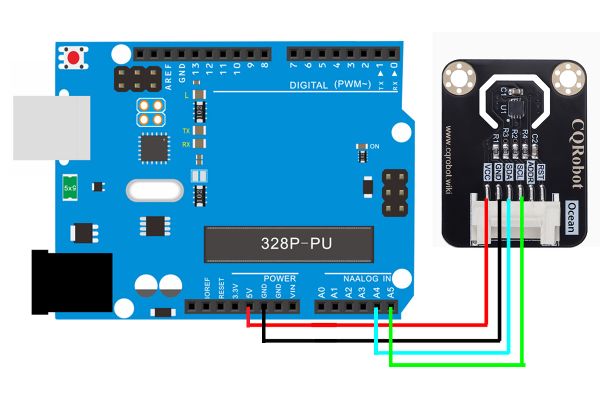
1. Arduino Connection Method
1.1 Software download link: https://www.arduino.cc/en/software
1.2 Download and Run the Test Examples
#include "ky_STS3X.h"

/*!
 * Determine the IIC address according to the ADDR pin pulled high or low
 * ADDR pin pulled low: STS3X_IIC_ADDRESS_A   0x4A
 * ADDR pin pulled high: STS3X_IIC_ADDRESS_B   0x4B
 */
ky_STS3X sts(&Wire, STS3X_IIC_ADDRESS_B);


void setup(void)
{
    Serial.begin(9600);
    /*Wait for the chip to be initialized completely, and then exit*/
    while(sts.begin() != true){
        Serial.println("Failed to init chip, please check if the chip connection is fine. ");
        delay(1000);
    }

    /*!
     *@brief Set measurement frequency
     *@param freq: in the enum variable eFreq_t choose from e2S,e1Hz,e2Hz,e4Hz,e10Hz model
     */
    sts.setFreq(sts.e10Hz);

}

void loop() {
    Serial.print(sts.getTemperaturePeriodC());
    Serial.println(" C");
    delay(1000);
}
1.3 Experimental results
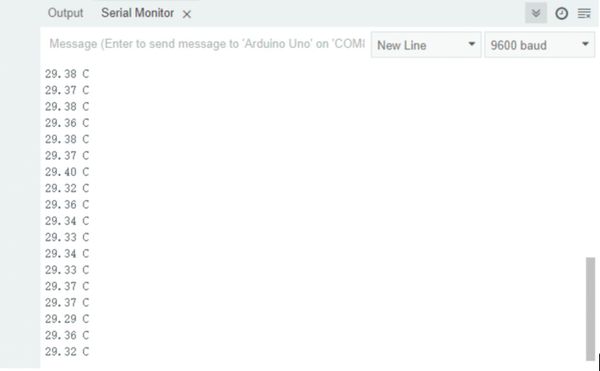
Connect the wires as above, upload the program, open the monitoring window of the software and set the baud rate to 9600; you can see the current detected ambient temperature, as shown in the figure below:
1.4 Code Description
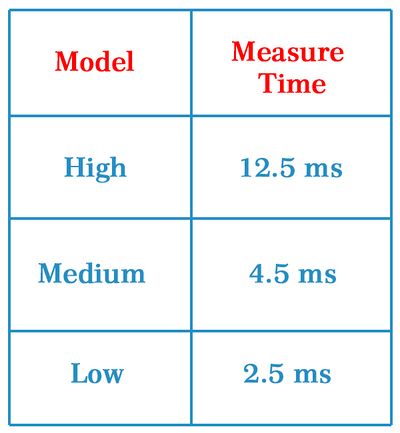
- Repeat mode selection: You can adjust the data repeat mode by modifying the parameters in brackets; different modes correspond to different measurement times;
- Measurement time: The time required to repeat sample collection when outputting measurement data once.
/*!
     *@brief set repeat mode
     *@param code: in the enum variable eCode_t choose from eHigh, eMedium, eLow model
     */
    sts.setRepeat(sts.eHigh);
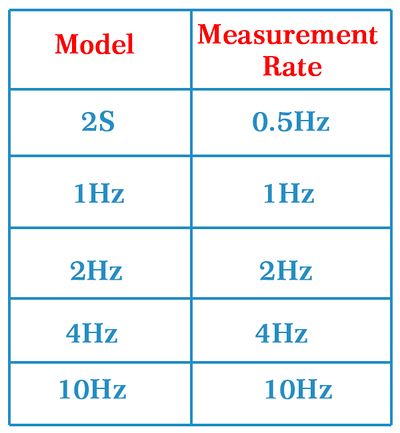
- Transmission rate selection: You can adjust the data measurement rate by modifying the parameters in brackets; different modes correspond to different measurement rates. (Note: Self-heating will occur when the rate is 10HZ)
 /*!
     *@brief Set measurement frequency
     *@param freq: in the enum variable eFreq_t choose from e2S,e1Hz,e2Hz,e4Hz,e10Hz model
     */
    sts.setFreq(sts.e10Hz);
1.4 List of main API functions
void setRepeat(eCode_t code);

    /*!
     *@brief Set the clock stretching. After the clock stretching is turned on, NAK will not be sent when the sensor has not completed the measurement, and the unfinished measurement command before the data is completed will not be sent until the measurement is completed.
     *@param clockStretch: whether to open the clock extension, true means open, false means closed
     */
    void setStretch(bool clockStretch);

    /*!
     *@brief Set the measurement frequency and turn on the sensor cycle measurement mode (setting the cycle measurement frequency is equivalent to sending an instruction to turn on the cycle measurement mode)
     *@param freq: Select e2S, e1Hz, e2Hz, e4Hz, e10Hz mode in the enumeration variable eFreq_t
     */
    void setFreq(eFreq_t freq);

    /*!
     *@brief turn on the heater
     */
    void setHeaterOn();

    /*!
     *@brief turn off the heater
     */
    void setHeaterOff();

    /*!
     *@brief interrupts what the sensor is doing, forcing it into idle mode
     */
    void breakSensor();

    /*!
     *@brief set parameters back to default
     */
    void resetSensor();

    /*!
     *@brief get and save all the current state of the sensor
     *@n you need to call this interface after a period of time before you can use other APIs to get the current status of the sensor
     */
    void getStatus();

    /*!
     *@brief get checksum status
     *@return true: checksum of last write transfer was correct
     *@n      false: checksum of last write transfer failed
     */
    bool checkSumStatus();

    /*!
     *@brief get command status
     *@return true: last command executed successfully
     *@n      false: last command not processed.
     */
    bool commandStatus();

    /*!
     *@brief detect system reset
     *@return true: no reset detected since last 'clear status register' command
     *@n      false: reset detected (hard reset, soft reset command or supply fail)
     */
    bool systemResetDetected();

    /*!
     *@brief Temperature Tracking Reminder
     *@return true: no alert
     *@n      false: alert
     */
    bool temTrackingAlert();

    /*!
     *@brief Get heater status
     *@return true: Heater OFF
     *@n      false: Heater ON
     */
    bool heaterStatus();

    /*!
     *@brief Get alert pending status
     *@return true: no pending alerts
     *@n      false: at least one pending alert
     */
    bool alertPendingStatus();

    /*!
     *@brief In the single measurement mode, get the current temperature. Note: It is necessary to ensure that the sensor is in an idle state, and you can call the relevant api: breakSensor()
     *@return unit:℃
     */
    float  getTemperatureSingleC();

    /*!
     *@brief In the periodic measurement mode, the current temperature is obtained. Note: the sampling frequency needs to be set in advance, and the relevant api can be called: setFreq(eFreq_t freq)
     *@return unit:℃
     */
    float  getTemperaturePeriodC();
Raspberry Pi Example and Test Code
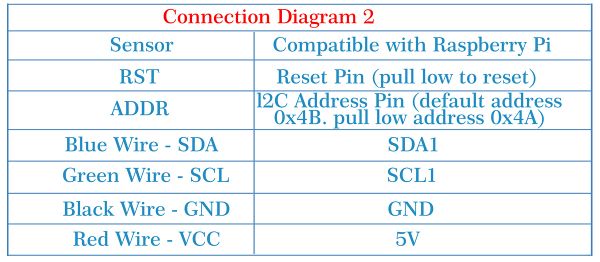
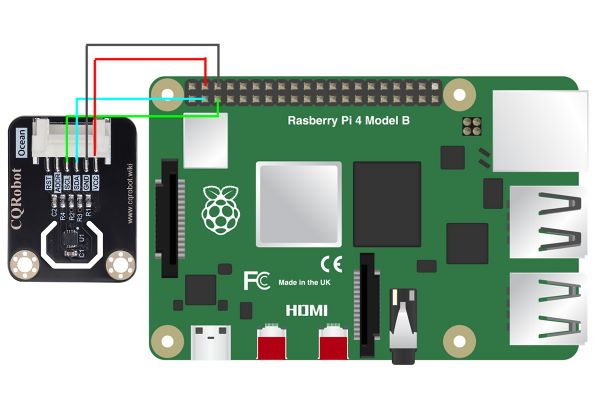
1. Raspberry Pi Connection Method
1.1 Download and Run the Test Examples
Note: Here take Raspberry Pi 4B as an example, others are for reference only.
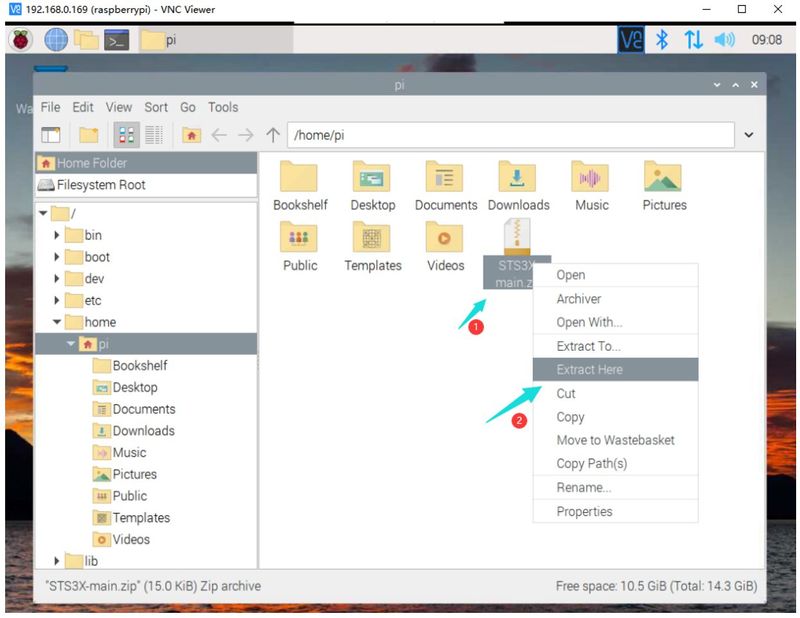
1.2 Add the data package "STS3X-main.zip" to Raspberry pi, and unzip it:
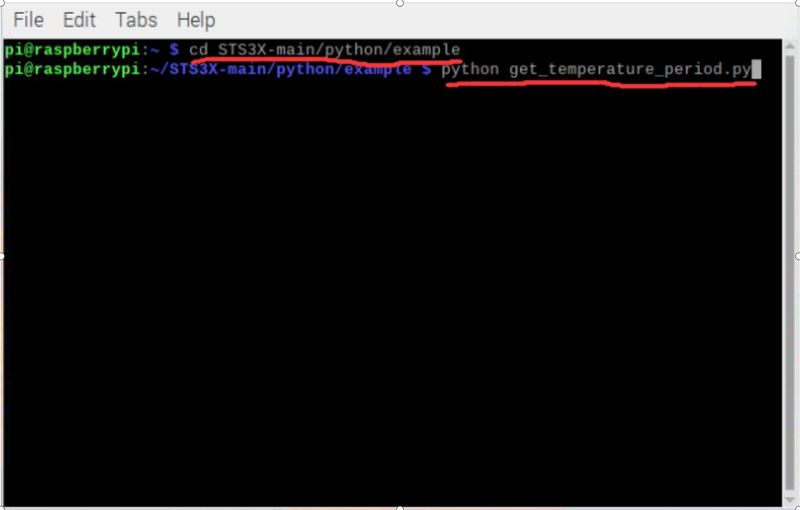
1.3 Enter the Raspberry Pi terminal to execute the command:
cd STS3X-main/python/example
python get_temperature_period.py
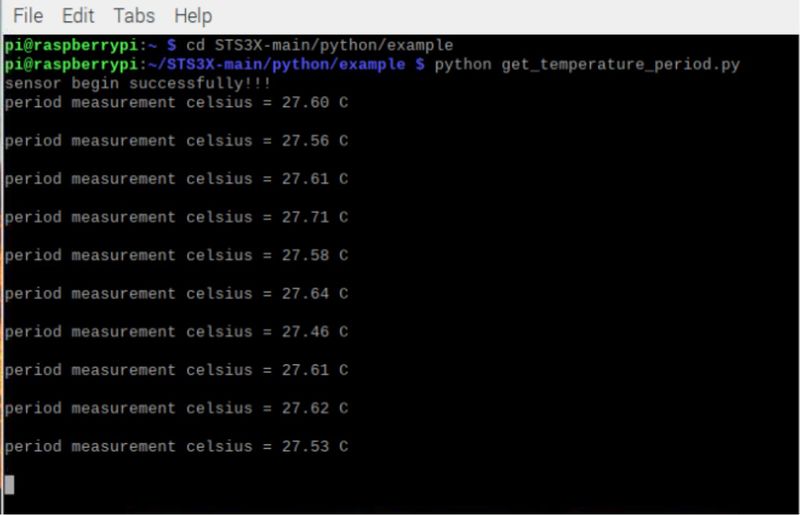
1.4 The STS35 temperature sensor detects the temperature of the environment as shown in the figure:
