Digital RGB LED
Contents
Introduction
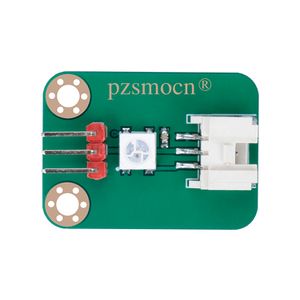
This is a cascadable RGB full-color single lamp bead module. only needs one signal pin, and the RGB LED strip constructed by cascading it has extremely low power consumption. This function can cascade more than 100 modules, the total length can reach tens of meters, but the power requirement does not exceed 5V 2A. This makes it easier and more flexible to configure the length of the RGB LED strip. This module uses high-quality and high-brightness WS2812 RGB LED, which is fully compatible with the driving circuit or program used by the light strip, while maintaining an excellent display effect. For existing procedures from RGB LED strips to RGB LED module strings, this hardly needs to be changed.
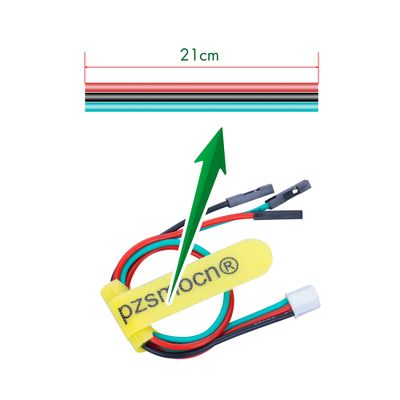
The module comes with a JST PA SMT 3-Pin buckle socket. Also, a JST PA SMT 3-Pin to DuPont female single-head wire is offered to facilitate wiring. Length: 210mm, buckle attached.
Product Size
Connection Diagram
Specifications
Module
- Operating Voltage: DC 3.3V-5.3V
- Maximum Current: 48 mA
- Quiescent Current: 0.7 mA
- Communication Interface: JST PA SMT 3-Pin interface
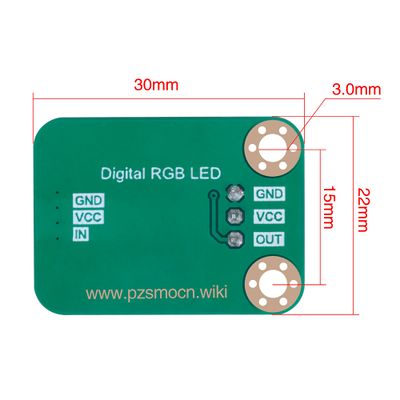
- Dimensions: 30mm * 22mm
- Fixing Hole Size: 3mm
Wire
- Withstand Voltage: <50V
- Withstand Current: <1000MA
- Length: 21CM
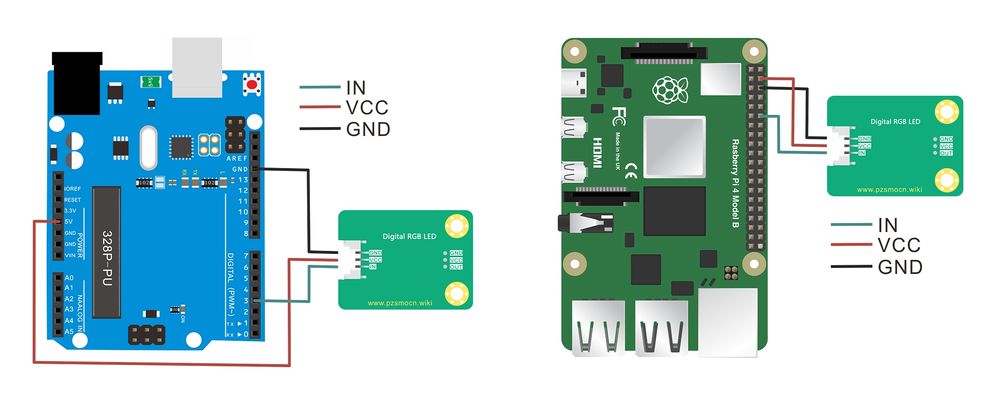
- Wire Sequence: Black-Negative power supply, Red-Positive power supply, Green-Signal input
Demo for Arduino
Note:
1. Place SPI and SD folders into libraries folder of compiler installation, for instance, C:\Program Files\Arduino\libraries.
2. We could change the number of RGB LED in #define NUM_LED 1 and set to 1 pcs RGB lED in the code.
 #include <Adafruit_NeoPixel.h>

    #define PIN_LED 3     // Control signal, connect to DI of the LED
    #define NUM_LED 1     // Number of LEDs in a strip

    // Custom colour1: Yellow
    #define RED_VAL_1       255
    #define GREEN_VAL_1     255
    #define BLUE_VAL_1      0

    // Custom colour2: Purple
    #define RED_VAL_2       255
    #define GREEN_VAL_2     0
    #define BLUE_VAL_2      255

    // Custom colour3: Cyan
    #define RED_VAL_3       0
    #define GREEN_VAL_3     255
    #define BLUE_VAL_3      255

    // Custom colour4: White
    #define RED_VAL_4       255
    #define GREEN_VAL_4     255
    #define BLUE_VAL_4      255

    Adafruit_NeoPixel RGB_Strip = Adafruit_NeoPixel(NUM_LED, PIN_LED, NEO_GRB + NEO_KHZ800);

    void setup() {
      RGB_Strip.begin();
      RGB_Strip.show();
      RGB_Strip.setBrightness(128);    // Set brightness, 0-255 (darkest - brightest)
    }

    void loop() {

      colorWipe(RGB_Strip.Color(255, 0, 0), 1000);  // Red
      colorWipe(RGB_Strip.Color(0, 255, 0), 1000);  // Green
      colorWipe(RGB_Strip.Color(0, 0, 255), 1000);  // Blue

      colorWipe(RGB_Strip.Color(RED_VAL_1, GREEN_VAL_1, BLUE_VAL_1), 1000);   // Custom colour1: Yellow
      colorWipe(RGB_Strip.Color(RED_VAL_2, GREEN_VAL_2, BLUE_VAL_2), 1000);   // Custom colour2: Purple
      colorWipe(RGB_Strip.Color(RED_VAL_3, GREEN_VAL_3, BLUE_VAL_3), 1000);   // Custom colour3: Cyan
      colorWipe(RGB_Strip.Color(RED_VAL_4, GREEN_VAL_4, BLUE_VAL_4), 1000);   // Custom colour4: White

      rainbow(20);  // Rainbow
    }

    // Fill the dots one after the other with a color
    void colorWipe(uint32_t c, uint16_t wait) {
      for (uint16_t i = 0; i < RGB_Strip.numPixels(); i++) {
        RGB_Strip.setPixelColor(i, c);
        RGB_Strip.show();
        delay(wait);
      }
    }

    void rainbow(uint8_t wait) {
      uint16_t i, j;

      for (j = 0; j < 256; j++) {
        for (i = 0; i < RGB_Strip.numPixels(); i++) {
          RGB_Strip.setPixelColor(i, Wheel((i + j) & 255));
        }
        RGB_Strip.show();
        delay(wait);
      }
    }

    // Input a value 0 to 255 to get a color value.
    // The colours are a transition r - g - b - back to r.
    uint32_t Wheel(byte WheelPos) {
      if (WheelPos < 85) {
        return RGB_Strip.Color(WheelPos * 3, 255 - WheelPos * 3, 0);
      } else if (WheelPos < 170) {
        WheelPos -= 85;
        return RGB_Strip.Color(255 - WheelPos * 3, 0, WheelPos * 3);
      } else {
        WheelPos -= 170;
        return RGB_Strip.Color(0, WheelPos * 3, 255 - WheelPos * 3);
      }
}
Test Methods and Results
Wire up, upload code to Arduino board and plug in power. RGB LED on module lights up different colors cyclically.
Demo for Raspberry Pi
Note: We could change the number of LED_COUNT = 1 # and set to 1 pcs RGB lED in the code.
#coding:utf-8
import time
from rpi_ws281x import PixelStrip, Color
import argparse

LED_COUNT = 1 #  the number of LED lights
LED_PIN = 18 # DI is connected to GPIO18

# keep the following code unchanged
LED_FREQ_HZ = 800000  # LED signal frequency in hertz (usually 800khz)
LED_DMA = 10          # DMA channel to use for generating signal (try 10)
LED_BRIGHTNESS = 255  # Set to 0 for darkest and 255 for brightest
LED_INVERT = False    # True to invert the signal (when using NPN transistor level shift)
LED_CHANNEL = 0       # set to '1' for GPIOs 13, 19, 41, 45 or 53

# every function that LED mode changes
def colorWipe(strip, color, wait_ms=20):
    """wipe out displayed color of pixels"""
    for i in range(strip.numPixels()):
        strip.setPixelColor(i, color)
        strip.show()
        time.sleep(wait_ms / 1000.0)

def theaterChase(strip, color, wait_ms=50, iterations=10):
    """chasing animation of lighting style of theater"""
    for j in range(iterations):
        for q in range(3):
            for i in range(0, strip.numPixels(), 3):
                strip.setPixelColor(i + q, color)
            strip.show()
            time.sleep(wait_ms / 1000.0)
            for i in range(0, strip.numPixels(), 3):
                strip.setPixelColor(i + q, 0)

def wheel(pos):
    """generate 0-255 rainbow color"""
    if pos < 85:
        return Color(pos * 3, 255 - pos * 3, 0)
    elif pos < 170:
        pos -= 85
        return Color(255 - pos * 3, 0, pos * 3)
    else:
        pos -= 170
        return Color(0, pos * 3, 255 - pos * 3)

def rainbow(strip, wait_ms=20, iterations=1):
    """draw rainbow and fade all pixels once"""
    for j in range(256 * iterations):
        for i in range(strip.numPixels()):
            strip.setPixelColor(i, wheel((i + j) & 255))
        strip.show()
        time.sleep(wait_ms / 1000.0)

def rainbowCycle(strip, wait_ms=10, iterations=5):
    """Draw a rainbow evenly distributed over all pixels """
    for j in range(256 * iterations):
        for i in range(strip.numPixels()):
            strip.setPixelColor(i, wheel(
                (int(i * 256 / strip.numPixels()) + j) & 255))
        strip.show()
        time.sleep(wait_ms / 1000.0)

def theaterChaseRainbow(strip, wait_ms=50):
    """rotating colorful lights"""
    for j in range(256):
        for q in range(3):
            for i in range(0, strip.numPixels(), 3):
                strip.setPixelColor(i + q, wheel((i + j) % 255))
            strip.show()
            time.sleep(wait_ms / 1000.0)
            for i in range(0, strip.numPixels(), 3):
                strip.setPixelColor(i + q, 0)

# Main program logic follows:
if __name__ == '__main__':
    # Process arguments
    parser = argparse.ArgumentParser()
    parser.add_argument('-c', '--clear', action='store_true', help='clear the display on exit')
    args = parser.parse_args()

    # Create NeoPixel object with appropriate configuration.
    strip = PixelStrip(LED_COUNT, LED_PIN, LED_FREQ_HZ, LED_DMA, LED_INVERT, LED_BRIGHTNESS, LED_CHANNEL)
    # Intialize the library (must be called once before other functions).
    strip.begin()

    print('Press Ctrl-C to quit.')
    if not args.clear:
        print('Use "-c" argument to clear LEDs on exit')

    try:
        while True:
            print('Color wipe animations.')
            colorWipe(strip, Color(255, 255, 0))  # Red wipe
            colorWipe(strip, Color(0, 0, 0), 30)
            colorWipe(strip, Color(0, 255, 255))  # Blue wipe
            colorWipe(strip, Color(0, 0, 0), 30)
            colorWipe(strip, Color(255, 0, 255))  # Green wipe
            colorWipe(strip, Color(0, 0, 0), 30)

            print('Theater chase animations.')
            print('Rainbow animations.')
            rainbow(strip)
            colorWipe(strip, Color(0, 0, 0), 50)
            rainbowCycle(strip)
            colorWipe(strip, Color(0, 0, 0), 40)
            break
        while True:
            rainbowCycle(strip)
            #print('***********************')
            colorWipe(strip, Color(0, 0, 0), 100)

    except:
        colorWipe(strip, Color(0, 0, 0), 100)
Test Methods and Results
1. Connect sensor to Raspberry pi 4B board, and put test code in folder way into Raspberry pi system.
2. Install pip firstly(skip this step if you installed)
sudo apt-get install python-pip
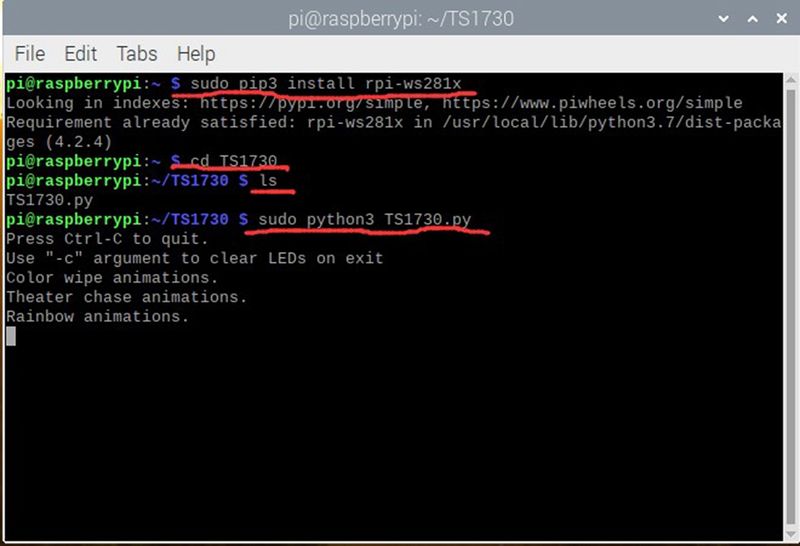
3. Execute the following commands to install related libraries.
sudo pip3 install rpi-ws281x
4. Execute the following command and install the relevant library, RGB LED on module lights up different colors cyclically and press Ctrl+C to end the program.
cd TS1730
ls
sudo python3 TS1730.py
