Metal DC Geared Motor w/Encoder CQGB37Y001
INTRODUCTION
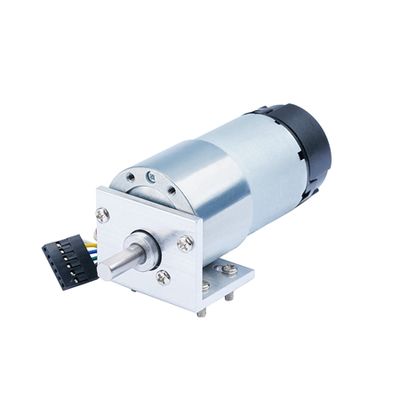
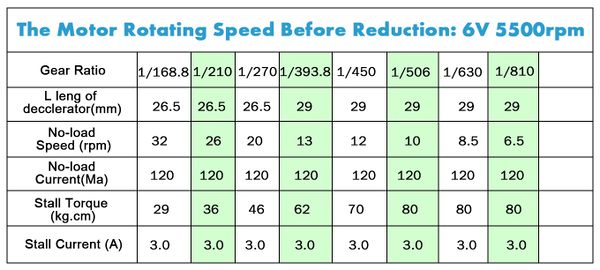
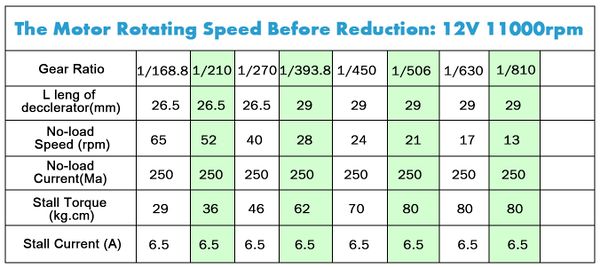
This is a DC motor with retarder and encoder, Driving voltage is 6V-12V, Gear ratio is 168:1, The motor comes with a Hall-type coding system, Which outputs 16 pulses per loop, Single output 2688 pulses per revolution. for Projects Such as Robot, Custom Servo, Arduino and 3D Printers.
Single Output 2688 Pulses Per Revolution:
- Gear Ratio: 168:1
- Each Loop Output Pulses: 16
- 168 * 16=2688
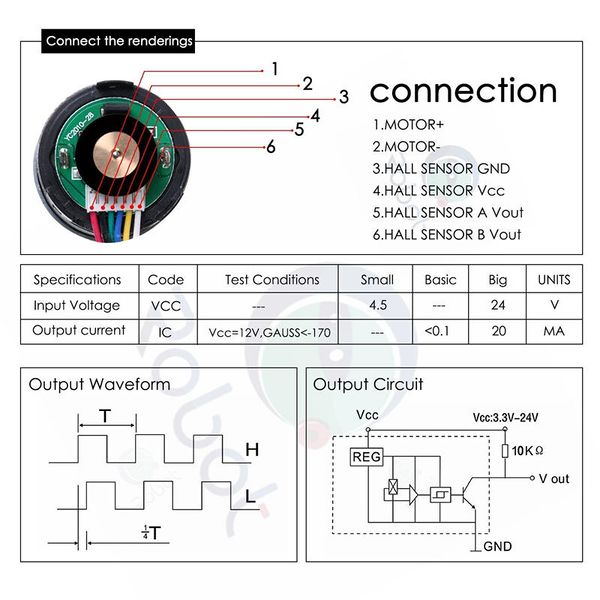
The rear of the motor is equipped with a dual channel Holzer effect encoder, AB dual output, single circuit per cycle pulse 16CPR, double down the road, a total output of 64CPR. Phase difference 90 degrees.
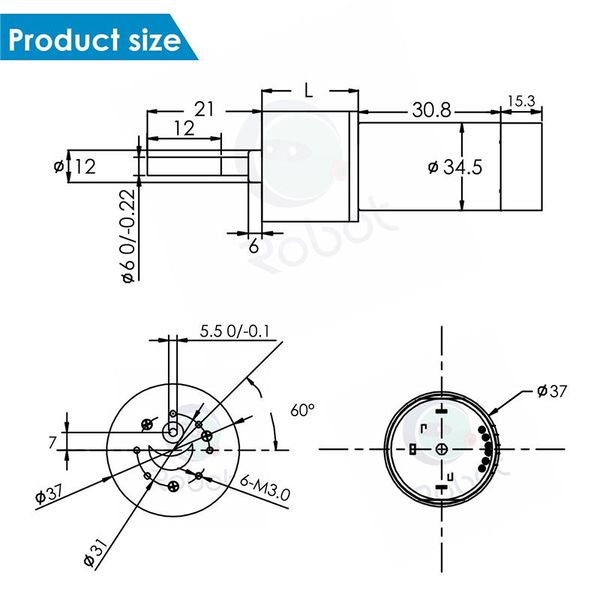
These units have a 0.61 inch long, 6 mm(0.24 inch)-diameter D-shaped output shaft. This motor is intended for use at 6V / 12V, though the motor can begin rotating at voltages as low as 1V.
The face plate has six mounting holes evenly spaced around the outer edge threaded for M3 screws. These mounting holes form a regular hexagon and the centers of neighboring holes are 15.5 mm(0.61 inch) apart.
At 250V DC between motor terminal & housing: 20 M Ω min.
NOTE
Do not screw too far into the mounting holes as the screws can hit the gears. CQRobot Manufacturer recommends screwing no further than 3mm (1/8 inch) into the screw hole.
SPECIFICATION
Motor Encoder
- Encoder Operating Voltage: 3.3V - 24V
- Encoder Type: Hall (Incremental Type)
- Encoder Resolution: 64CPR
Metal DC Geared Motor
Motor Size
Connect the Renderings
Encoder Diagram
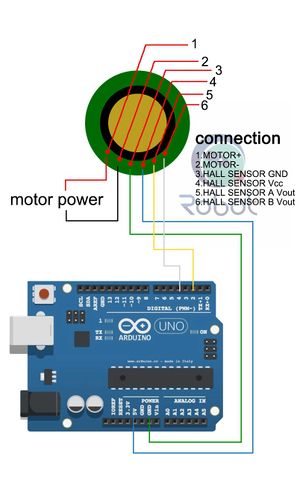
Diagram for Arduino UNO
Interrupt Port with Different Board
Notcie: attachInterrupt()
For example,with arduino UNO board, you want to use interrupt port 0(int.0). You should connect digital pin 2 with the board. So, the following code is only used in UNO and Mega2560. If you want to use arduino Leonardo or Romeo, you should change digital pin 3 instead of digital pin 2.
See the link for detail http://arduino.cc/en/Reference/AttachInterrupt
Encoder Sample Code
//The sample code for driving one way motor encoder const byte encoder0pinA = 2;//A pin -> the interrupt pin 0 const byte encoder0pinB = 4;//B pin -> the digital pin 4 byte encoder0PinALast; int duration;//the number of the pulses boolean Direction;//the rotation direction
void setup()
{
 Serial.begin(57600);//Initialize the serial port
 EncoderInit();//Initialize the module
}
void loop() {
 Serial.print("Pulse:");
 Serial.println(duration);
 duration = 0;
 delay(100);
}
void EncoderInit() {
 Direction = true;//default -> Forward
 pinMode(encoder0pinB,INPUT);
 attachInterrupt(0, wheelSpeed, CHANGE);
}
void wheelSpeed() {
 int Lstate = digitalRead(encoder0pinA);
 if((encoder0PinALast == LOW) && Lstate==HIGH)
 {
   int val = digitalRead(encoder0pinB);
   if(val == LOW && Direction)
   {
     Direction = false; //Reverse
   }
   else if(val == HIGH && !Direction)
   {
     Direction = true;  //Forward
   }
 }
 encoder0PinALast = Lstate;

 if(!Direction)  duration++;
 else  duration--;
}
